Setting Up WordPress on Amazon EC2 in 5 Minutes

More than half the websites that are live on the internet are powered by WordPress. From simple blogs to complicated e-commerce websites are also powered. For example a website AI content Detector which use AI and ML to detect the AI written content is built on wordpress. WordPress offers lot of flexibility to built the sites.
Today we’ll discuss how to quickly set up your WordPress site on something called Amazon EC2 Instance
Table of Contents
What is Amazon EC2?

To create a WordPress website, we need 2 things
- Hosting
To run a WordPress website, we have to store its data somewhere, make sure the website is running 24/7, and that it is accessible from anywhere. All of this processing has to happen on a Computer. Technically we can even make all of this happen on our personal computers. But then there are some obvious drawbacks to it, such as dealing with Power Cuts, Internet Bandwidth Costs, Computer Maintenance Issues, etc. That’s exactly the problem “Hosting” solves, in hosting usually what we are doing is renting a Virtual Computer from where we can “Host” our WordPress website. Multiple websites provide this service, let’s have a quick comparison between a few of them.
| Amazon EC2 | Bluehost | GoDaddy |
| Has all of the features that a traditional data center would have | Basic Features | Basic Features |
| Little On The Expensive Side | Has all ranges of plans – From Basic to Expensive | Budget-Friendly pricing |
| Up to 100% uptime | 99.99% Uptime | 99.97% Uptime |
| Suitable for people wanting to build complex websites, and have more custom requirements | Suitable for people who are fine with having basic features and do not have custom requirements | Suitable for users wanting a budget-friendly option and have more general requirements |
Hopefully, after this comparison, we can conclude What Hosting provider suits us the best. In this tutorial However we’ll be focusing mainly on hosting an Amazon EC2 instance.
- Domain Name
Let’s assume for now that we have our hosting part done, and we have a virtual computer that Amazon “Hosted” somewhere else. All computers connected to the internet have something called an IP Address assigned to them which can be used to access their computer/server from anywhere in the world. Now users using our blog obviously won’t be typing 125.31.3…. Or some random IP address whenever they want to visit our blog. It’ll be too much work to type and remember. That’s why we have to create a Domain that will map our Website Name to the IP Address of our “Virtual Computer”. ( For eg. https://www.google.com maps to 142.250.182.46 IP address as of today )
Note:
As “Virtual Computer” is not a formal term, from here on I’ll be referring to it as an Amazon EC2 Instance.
Part 1: Creating an AWS Account
Creating an AWS account should be pretty quick and straightforward if we have all of our requirements ready. To create an AWS Account, whether it be paid or just a free trial. We will need a Valid Payment Method such as a Credit/Debit Card to register. After making sure that we have a valid credit/debit card. We are good to go!

- Fill in the basic information such as Email and Account Name, and Verify our Email Address
- It will then prompt us for entering our payment information, and our AWS account should be created
Note: AWS will not charge us anything for the Free Tier, however, there might be a temporary charge of 1 rupee to verify that the payment information is valid
Part 2: Creating the EC2 Instance
Now that we have our AWS account set up. Creating an EC2 Instance should be a matter of just a few clicks. To do that, first go to our AWS Dashboard, which should look something like this
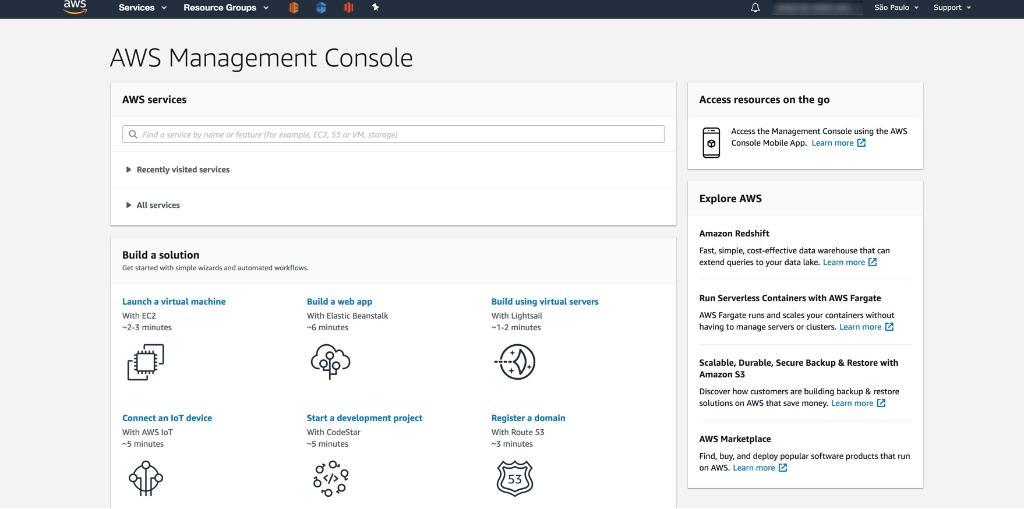
- As we discussed before, to host the website we’ll be needing a “Virtual Computer” or an EC2 Instance. Under the “Build a solution” Menu, click on the first option “Launch a virtual machine”
We will then be greeted with the following screen asking us to fill in the details of the “Virtual Machine” that we want
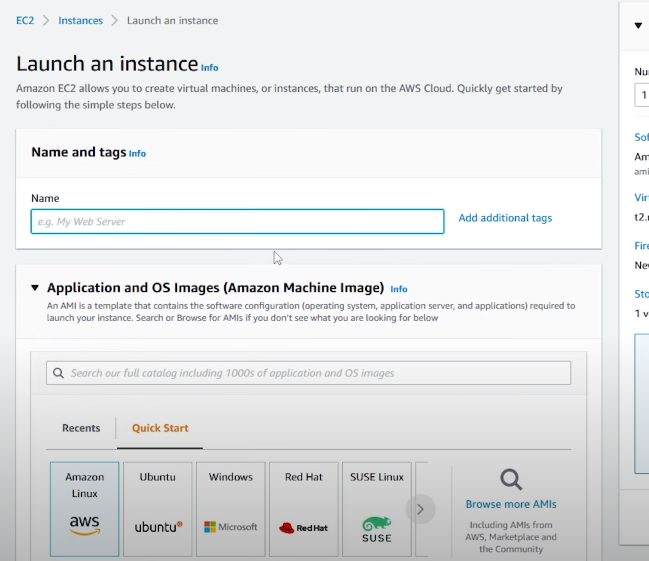
Let’s look at all of the sections of this page
Name and Tags
- Fill in the name of our machine, ( not related to the domain name in any way )
Application and OS Images
- Coming the Application and OS images section, tells about the OS we want to install on our machine. For this tutorial we’ll be using the Ubuntu Server as it is the most trusted and popular choice for a server, not to mention that it is also incredibly easy to work with.
Instance type

- Instance type describes how much processing power and how much RAM our Virtual Computer will have.
- Our requirements may vary from Running a Simple blog with a few thousand viewers/day to Running a resource-intensive website having millions of clicks/day. Depending on those requirements, we can choose what suits us the best.
- If we’re just learning, then amazon provides a Free Tier which has around 1GiB RAM, and 1 CPU Core ( 1vCPU )
Key Pair
- To use our “Virtual Computer” on our PC, Amazon would need to verify that it is us and not someone else using our Virtual Computer, to do that it gives us an option to Generate a Key Pair using which it can access our EC2 instance later.

- Click on Create a new key pair, and we should get the following menu
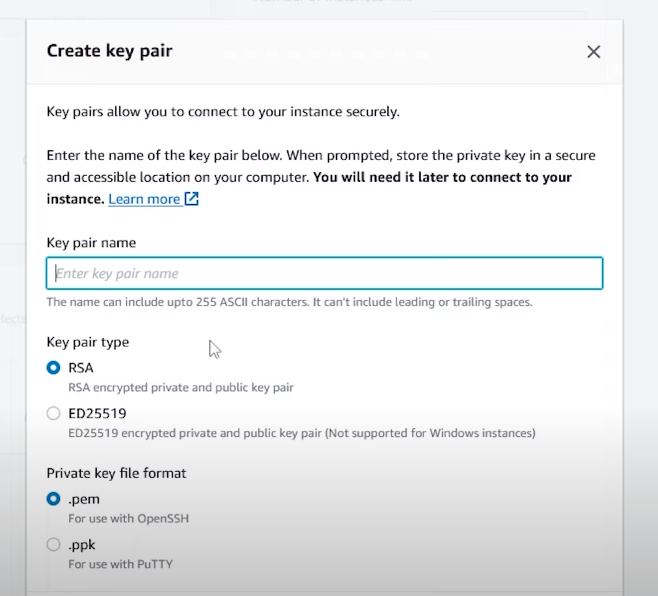
- The only thing we need to do is, to set the name of our KeyPair and Select the Private key file format as .ppk ( we’ll get into why we’re doing this later )
Note
Make sure that this file is safe and only on our computer because if someone else got access to this file, they would be able to access our EC2 Instance, which would compromise the security of our website.
Network Settings
- These options determine what level of access the general public has to our server.
- Since we want people to be able to view our website on their browser, turn on the HTTP and HTTPS options
Storage
- This option allows us to choose what level of storage requirements our website has
- You can choose any size for the SSD of our virtual computer. However, we’ll be going for the default 8 GB SSD that is included in AWS Free Tier
After all of this configuration, just have a quick look to confirm the details, and click on Create Instance button to create our EC2 Instance.
After creating our instance, go to the EC2 Dashboard, and under the Instances section, if we find our created instance, and it’s showing as Running, then we’ve successfully created the instance and can move on to the next step
Part 3: Assigning an Elastic IP Address
After going to the instances section and looking at our newly created EC2 Instance, we might have noticed that it has an IP Address associated with it.
Now with the way AWS works, there are thousands of requests to create instances and similarly to delete them. As there is a limit on the number of IP Addresses available, we might notice that the IP Address of our instance keeps changing whenever we reboot it or switch it off temporarily.
To overcome this, AWS launched something called Elastic IP Addresses, which, for a small cost ensures that our IP Address stays the same, even if we reboot/power down our virtual machine. We can learn more about them here.
Creating an Elastic IP
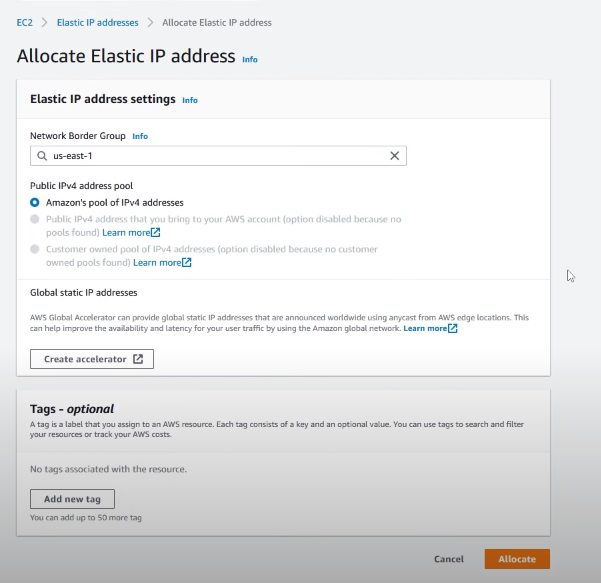
- Go to our EC2 Dashboard
- Choose Network & Security -> Elastic IP
- Click on Allocate Elastic IP Address
- Choose Amazon’s Pool of Ipv4 Addresses
- Click Allocate!
Associating the Created IP to our EC2 Instance
To associate the newly created Elastic IP Address with our EC2 Instance,
- Click on the Actions menu in the top right corner and select “Associate IP Address”
- It will then prompt us to choose the EC2 Instance, select the one which we created
- The IP address of our EC2 Instance should now be the Elastic IP Address
Before moving ahead, Go to the EC2 Dashboard -> Instances and make sure that our instance has all the correct details, and that its IP Address matches with the one we had assigned to it ( Elastic IP )
Part 4: Connecting to the Server (SSH)
This process might vary depending on the operating system we are using, since most of the people would be using Windows, we’ll discuss how to connect our EC2 Instance on our Windows machine. However, if we are on Linux/macOS don’t worry as the procedure will almost be the same.
Installing the SSH Client
If we don’t know what an SSH client is, it’s a way for us to access the terminal of our virtual computer using the SSH protocol (Secure SHell). There are many different SSH clients on the market, but for our purposes, we’ll be using PuTTY
Getting SSH details of our EC2 Instance
Before connecting to our EC2 Instance, we have to make sure that we have all the necessary details, to get those
- Right-click on our EC2 Instance and select Connect to Instance option

We will be prompted with a similar screen
- Select the SSH Client and take a note of the following details, as we’ll need them for connecting using PuTTY:
- Host Name: Under the example section we will find something like ubuntu@ec2-342………amazonaws.com, this is our hostname
Connecting Using PuTTY
- Open PuTTY and you should be granted the following screen
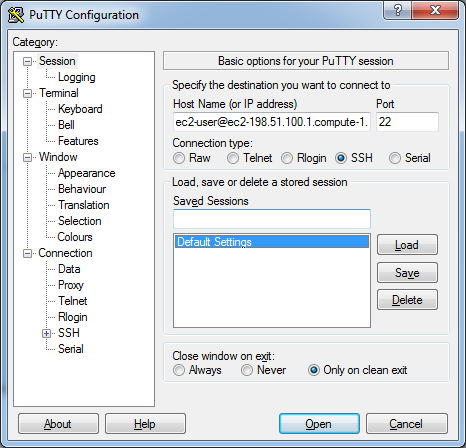
- In the HostName, section fill in the HostName which we copied earlier ( recall the previous section )
- Set the Port as 22
- As we are connecting using SSH, set the connection type to SSH
- Open Connection -> SSH -> Auth and click on Browse then select the .ppk file which we downloaded earlier
Verify all of our details and click on Open to start our SSH connection if everything went alright, we should be greeted with a new terminal screen.
Part 5: Installing WordPress on Our EC2 Instance
Now that we have our EC2 instance running, we can connect to it. It’s finally time for us to set it up with WordPress. But before doing that we have to install its dependencies.
Installing Apache Runtime
Apache is an Open-Source Software that helps WordPress to host our server. To install apache, simply run the following command in the PuTTY Terminal
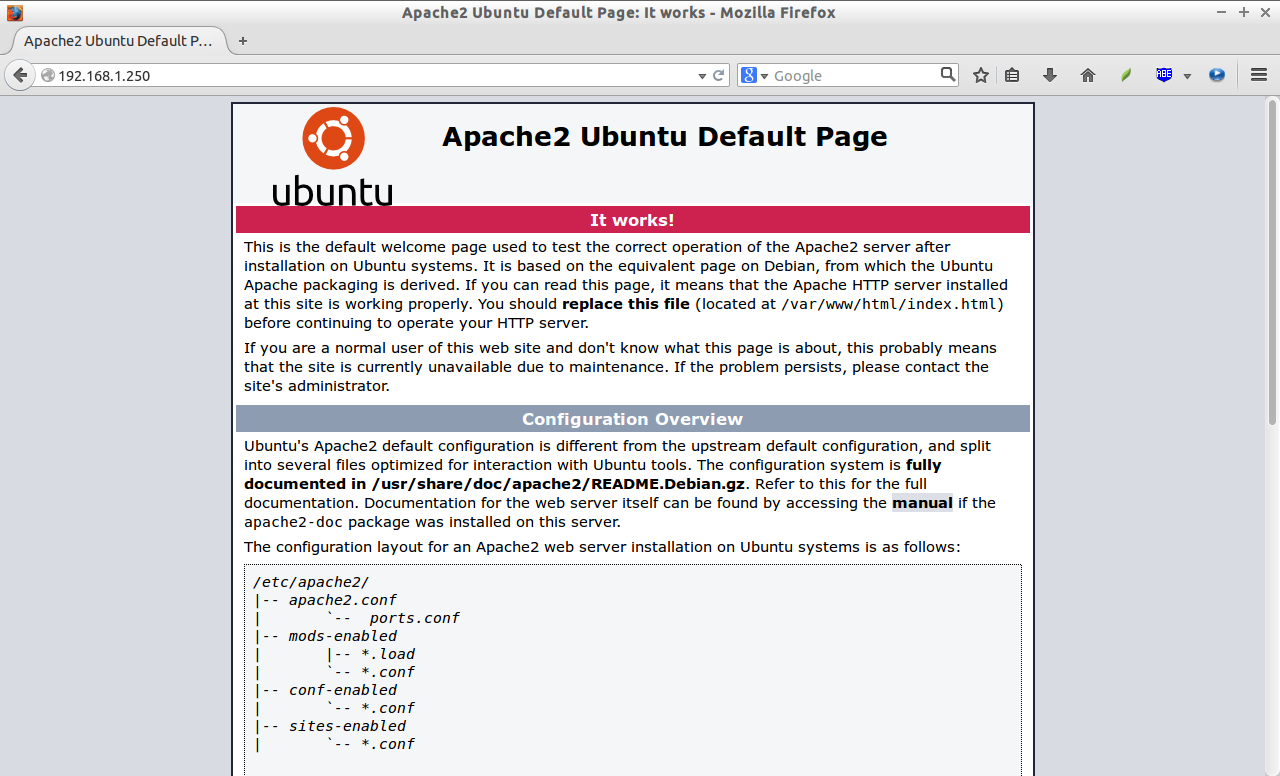
sudo apt-get install apache2After installing this, we can check if the server is running by typing in our Elastic IP Address in our browser. If everything went alright we should see the following page
Installing PHP and MySQL Server
Along with Apache2, Running WordPress also requires us to install PHP and MySQL, to do that we need to run the following command
sudo apt install php libapache2-mod-php php-mysql mysql-serverSetting up MySQL Database for Server
For WordPress to be able to access our database, we have to do some initial setup
- Firstly, login into our MySQL by running the following command
sudo mysql -u root- Then inside MySQL, change our auth plugin to mysql_native_password and choose a strong password for the root
ALTER USER 'root'@'localhost' IDENTIFIED WITH mysql_native_password by 'ReallyStrongPassword';- For the WordPress database, create a user wordp_user by using the following command
CREATE USER 'wordp_user'@localhost IDENTIFIED BY 'ReallyStrongPassword';- Create the WordPress database
CREATE DATABASE wp;- Grant all privileges on this newly created wp database to wordp_user
GRANT ALL PRIVILEGES ON wp.* TO 'wordp_user'@localhost;Installing WordPress
To install WordPress, we first have to download it from their official website

Copy the .tar.gz URL and download it on our Virtual machine using wget ( wget is a Linux tool used for downloading content from any URL )
wget https://wordpress.org/latest.tar.gzUnzip the downloaded .tar.gz file
tar -xvf latest.tar.gzTo host the WordPress site, we have to copy the contents inside the WordPress/ folder to /var/www/Html ( /var/www/Html is the default directory from which apache2 hosts the website )
sudo mv wordpress/ /var/www/htmlRestart the apache2 web server
sudo systemctl restart apache2After restarting the server, we have to do some additional setup. To do that, we first have to go to the following URL <ELASTIC IP>/WordPress, where ELASTIC IP is the Elastic IP address of our EC2 Instance. Then you’ll be greeted with the following screen
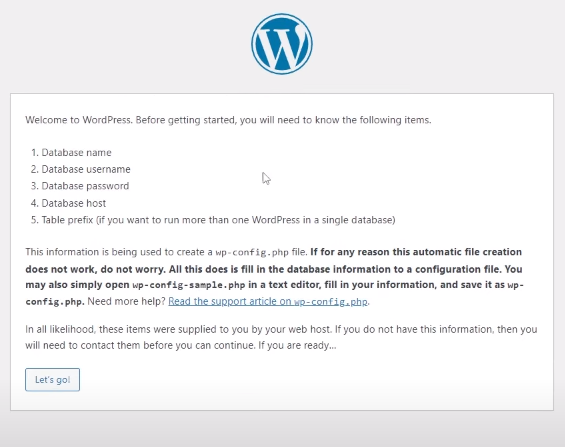
Click on Let’s go and fill up the details below ( recall Setting up MySQL Database ) section.

In our case, the data would be
- Database Name: wp
- Username: wordp_user
- Password ReallyStrongPassword
- Database Host localhost
- Table Prefix wp_
Then simply click on submit, and we should be good to go!
From here on, we have to fill in the basic information about our website, such as its Title, Admin Username, Password, etc.
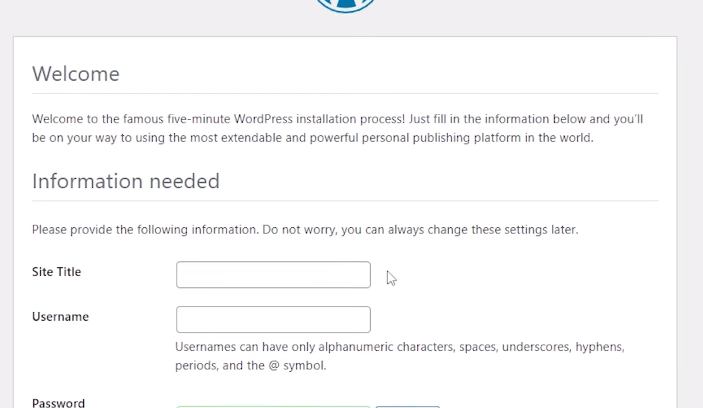
After this, our WordPress website should be up and running. We might have noticed that for accessing the homepage of our website, the URL is <IP Address>/WordPress instead of just <IP Address> to remove the /WordPress we have to make some changes to the Apache2 Configuration
To do that simply navigate to /etc/apache2/sites-available and edit the 000-default.conf file by changing the DocumentRoot property to /var/www/html/WordPress instead of it’s previous /var/www/html
What it does is that it changes the DocumentRoot or the Root of the Website to the /var/www/html/wordpress directory instead of adding /WordPress everywhere on the website

Then Simply Restart Apache2 and congrats! We have successfully installed WordPress on our EC2 Instance
Part 6: Adding A Domain Name To Your Website
As we already discussed at the beginning, it’s not practical for everybody to type in <ELASTIC IP> every single time they want to visit our page. So we need to buy a domain name and attach it to our Elastic IP Address so that people can access our site using its domain name
Don’t worry as it is not a complicated procedure at all, the domain name registration situation has improved a lot in the past few years. We’ll be done linking our domain name to our WordPress EC2 Instance within a few clicks.
- The first thing that we have to do is to register a domain name, to do that we would recommend Hostinger as it has extremely cheap prices for newcomers.

- After registering our domain name, be prompted to add something called DNS Records.
- DNS is something called a “Domain Name Server” which is responsible for linking our Domain Name to our Elastic IP Address.
- To do that we simply have to add a record of Type A and put in our IP Address, click on save! And within a few hours, we should be able to access our WordPress website with the registered domain name.
Conclusion
Congratulations on coming this far and creating the WordPress website. Now what’s left for us is to explore more interesting functions like WordPress Plugins which can improve the look and design of our website. Make sure to tinker around with the Settings to make the website fit all the required needs. In the end, we hope we do great things with our brand-new website!
