Building a Real-Time Analytics Application Using Socket.io & Node.js – TUTORIAL

Whether you’re interested in soccer or cricket, you may have wondered at some point, how do these scores get updated almost instantly? We will learn exactly how to do this kind of thing by using something called sockets, which can be done without refreshing the page.
It is because they help in enabling Real-Time communication between the Server and Client without continuously making requests/refreshing the page every few seconds to get the latest data. Hopefully, this got you excited about Sockets so let’s dive in!
Table of Contents
What is Socket.io?

Let’s say you want to build a website ( for eg. a scoreboard ) that updates the scores without having the user refresh it time after time.
If you’ve never heard about sockets then a naive solution that you might come up with is to Request the Latest Data Every 1-2 Seconds. This might work but there are a few problems with it
- Requesting data every 1-2 seconds is not real-time
- This would increase the load on the server as every user would constantly be performing requests.
A better solution to this problem would be to use Socket.io. Socket.io is built upon a technology called WebSockets that works a little differently than standard HTTP Requests.
Instead of killing the connection between server and client after a request is done ( as with http ), WebSockets keep the connection alive and listen for messages from the server. This way the Server and the Client can have real-time communication using just 1 request
What are Node.js & Express?

Before moving ahead we need to understand what Node.js and Express are and what are the differences between them.
- Node.js to put it bluntly is a JavaScript runtime that allows us to create Web Servers.
You might have a question now, “But if Node.js Can create Servers why do we even need Express?”.
True, you don’t even need Express to create Web Servers. You can very well create the whole Server using just Node.js, but Express is a framework that simplifies the code that we need to write by a HUGE amount, for your information, Express is not the only framework available for Node.js there are tons of other frameworks too but Express is considered to be the standard and is the most-used framework for Node.js. It’s a very rare scenario to see someone make a Server using just Node.js
Note: Since Node.js requires you to write Javascript, we recommend that you have a basic understanding of javascript to be able to grasp the concepts better.
What will we build in the Tutorial?
Since this is a tutorial, we’ll be building a small application as we learn about Socket.io.
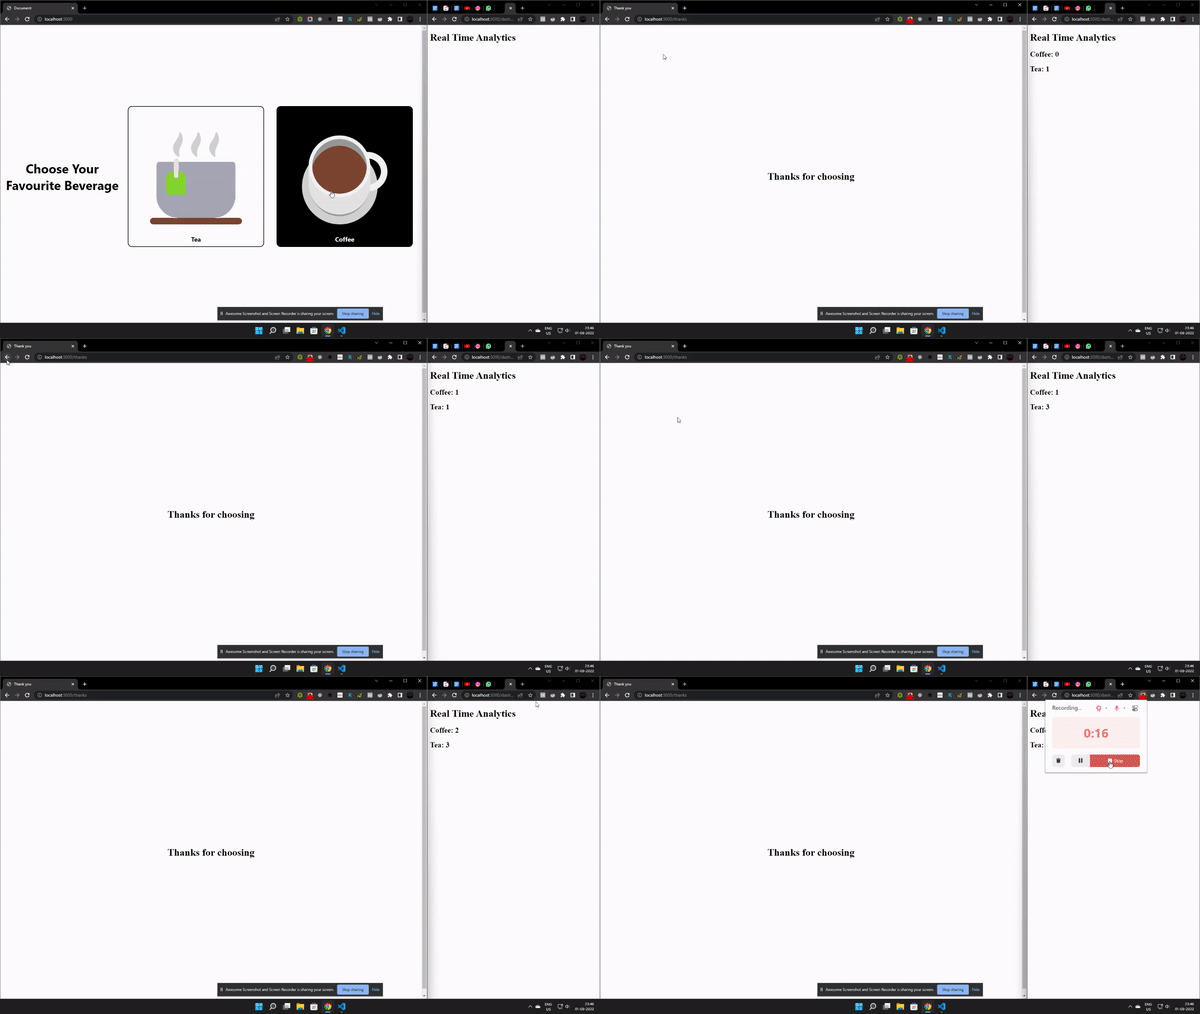
The app will be a simple poll between Tea vs Coffee and there’ll be a /dashboard section where everyone can get Real-Time Analytics of the poll results in
To keep you excited here’s a little peek at the application
Part 1: Installing the required tools for the Socket.io Application
Before getting started on building the Socket.io application, we must install all of the required tools
Node.js & NPM
Node.js as we discussed is a JavaScript Runtime Environment used to create the server.
NPM or Node Package Manager is a tool that comes bundled with Node.js and is used to install additional packages/plugins for a Node.js Project.
To install Node.js is not a complicated task at all, just visit their website, download the latest stable version (16.16.0 LTS as of writing this article) just follow the instructions on the installer and you should be good to go.
IDE (Integrated Development Environment)
IDE is a program where we can write code, it has advanced features such as syntax highlighting, error checking, etc which makes it convenient for developers.
There are many kinds of IDE available on the market like (Sublime text, Atom, Notepad++, IntelliJ Idea, etc) but for our purposes, we’ll use the most popular/recommended one called Visual Studio Code (which is also my personal favorite)
Express & Socket.io

Since express & socket.io are frameworks of Node.js there’s no way to “install” it on your computer directly. Whenever installing a framework in a node.js app we have to install it in the project directory for every project in which we want to use the frameworks
For now, it is enough that we have IDE and Node.js installed.
Part 2: Building The Basic Structure of Socket.io Application
Let’s start by creating the Node.js Project Folder and name it real_time_analytics
Then, to initialize a new Node.js Project inside that folder, we have to run the following command
npm initYou might then be prompted for additional details about the app, such as package name, description, version, etc. Fill up those as required and the Node.js Project should now be created

Understanding the components of a Node.js project
You might have noticed that as soon as you created your project a few files appeared, out of them the only thing we care about is package.json, this file consists of all of the details of the project ( including Project Name, Description, Version, the frameworks/packages installed.. etc )
Installing Express & Socket.io
Now that we have the Node.js project created, it’s time for us to finally install Express.js, to install packages in a node.js project we use something called Nodejs Package Manager or NPM.
The syntax for installing Express.js or any other package available on npm is to simply run the following command in the terminal ( remember you can always access the Visual Studio Code terminal by using the shortcut Ctrl + Shift + ~ )
npm install expressSimilarly, run the following command to install socket.io
npm install socket.ioBuilding the UI for the Socket.io App
After looking at the final product, you might have guessed that we have 3 pages/routes for this application. They are
- The home route ( Where users make their choice )
- The Thanks Page ( Every user who makes a choice is redirected to a Thank You page )
- The Dashboard Page ( This is where we see Real-Time Analytics for the Tea vs Coffee poll are visible )
Let’s start by working on each page one-by-one
Home Page
<!DOCTYPE html>
<html lang="en">
  <head>
    <title>Tutorial App</title>
  </head>
  <body>
    <h1>Choose Your Favourite Beverage</h1>
    <div class="options">
      <div class="option-container" id="tea">
        <div class="emoji">🍵</div>
        <div class="text">Tea</div>
      </div>
      <div class="option-container" id="coffee">
        <div class="emoji">☕</div>
        <div class="text">Coffee</div>
      </div>
    </div>

  </body>
</html>- The above code should be pretty much Standard HTML with the following components
- Main Heading: This is the main heading of the app “Choose Your Favourite Beverage”. To make the text bold and clear, we wrap it inside h1 or heading1 tags
- Two Option Containers: We then have 2 containers that have Tea & Coffee as options in them
Since this is a simple & small application let’s include the styling inside the HTML file itself by using the <style></style> tags
  <style>
      * {
        font-family: "Segoe UI", Tahoma, Geneva, Verdana, sans-serif;
      }
      body {
        height: 100vh;
        display: flex;
        justify-content: center;
        align-items: center;
      }
      h1 {
        text-align: center;
        font-size: 40px;
      }
      .options {
        display: flex;
        justify-content: center;
      }
      .emoji {
        font-size: 300px;
      }
      .option-container {
        display: flex;
        flex-direction: column;
        align-items: center;
        border: 2px solid black;
        margin: 20px;
        padding: 10px;
        border-radius: 3%;
      }

      .option-container:hover {
        cursor: pointer;
        background-color: black;
        color: white;
      }
      .text {
        font-size: 20px;
        font-weight: 700;
      }
    </style>
Thank you Page
<!DOCTYPE html>
<html lang="en">
  <head>
    <title>Thank you</title>
  </head>
  <body
    style="
      display: flex;
      justify-content: center;
      align-items: center;
      height: 100vh;
    "
  >
    <h1 style="text-align: center">Thanks for choosing</h1>
  </body>
</html>
This part should also be pretty simple as the entire page is just an h1 tag that has the text Thanks for Choosing
Dashboard
This is the main part of the application, the HTML Code for it should still be pretty simple though
<!DOCTYPE html>
<html lang="en">
  <head>
       <title>Dashboard</title>
  </head>
  <body>
    <h1>Real Time Analytics</h1>
    <h2 id="coffee"></h2>
    <h2 id="tea"></h2>
   </body>
</html>
The HTML for the dashboard page has a main heading (h1) called Real Time Analytics and below that, we have two h2 elements that represent the data for Coffee and Tea respectively
Now that we have created 3 html files, it’s time to add Express.js Routes for them so that these web pages can be accessed by the user
To do that, add the following code in the app.js file ( or whatever JavaScript file is the Main Entry Point of the Node.js Project )
const express = require("express");
const app = express();


app.get("/", (req, res) => {
  res.sendFile(__dirname + "/index.html");
});

app.get("/thanks", (req, res) => {
  res.sendFile(__dirname + "/thanks.html");
});

app.get("/dashboard", (req, res) => {
  res.sendFile(__dirname + "/dashboard.html");
});


app.listen(3000, () => {
  console.log("server started");
});
Let’s try to understand the above code step-by-step
- Firstly we include/import Express into the application by using the require(“”) function provided by Node.js
- Then we create the Express app by calling the express() function and storing the result in the app variable
- Then, we create 3 routes /, /thanks, /dashboard and as a response to these routes, we simply send the respective html file using the res.sendFile() function provided by the response object
- After adding the routes we can start the server on port 3000 ( or any other port ) using the app.listen() function provided by the express app
Part 3: Adding Sockets to the App
Now that we are done with adding HTML to the application, it’s finally time to add some functionality to it by including Sockets
Socket.io has 2 parts
- Socket on Server Side
- Socket on Client Side
The way data flow works in Sockets is
- The Server waits for the Client to visit the web page, and once visited creates a Socket between itself and the client
- If the Client has to pass data to another client or the server, the data always goes firstly through the Socket between the Client and Server
- Then, with the received data from the Client Socket. The server can now decide how to handle the data
- The server can send received data to Multiple Clients as it holds all of the Sockets for active clients or it can discard the message altogether
Let’s first start by implementing the Socket on the Client Side
Socket.io on the Client Side
To do that we add the following code inside index.html,
<script src="/socket.io/socket.io.js"></script>
    <script>
      let socket = io();
      let coffee = document.getElementById("coffee");
      let tea = document.getElementById("tea");

      coffee.addEventListener("click", function (e) {
        socket.emit("chosen", "coffee");
        window.location.href = "http://localhost:3000/thanks";
      });

      tea.addEventListener("click", function (e) {
        socket.emit("chosen", "tea");
        window.location.href = "http://localhost:3000/thanks";
      });
    </script>
As always let’s try to break down the above code step-by-step
- Firstly we import Socket.io by adding /socket.io/socket.io.js file as a <script> tag ( don’t worry about the existence of this file as it was automatically downloaded when we installed the socket.io npm package
- Then, we get the two elements ( Coffee, Tea ) by using document.getElementById() and store the result in variables coffee, tea respectively
- We then add an OnClick EventListener that is executed as soon as the user clicks either Coffee or Tea Buttons
- Inside these event listeners we use socket.emit() to send the data to the server and then redirect to the Thank You page using window.location.href
- socket.emit() takes in 2 parameters:
- The action that has been performed ( chosen in our case, indicating that the user has chosen something, this can be anything word/phrase you like )
- The Data to be passed, Socket.io supports all data types such as Strings, Integers, Arrays, and even Binary Files
Now we have to work on the socket in the dashboard.html page
 <script src="/socket.io/socket.io.js"></script>

    <script>
      let socket = io();

      let coffee = 0,
        tea = 0;
      socket.on("chosen", function (choice) {

        if (choice == "coffee") coffee++;
        else tea++;

        document.getElementById("coffee").innerHTML = `Coffee: ${coffee}`;

        document.getElementById("tea").innerHTML = `Tea: ${tea}`;
      });
</script> - The Socket.io setup process should be pretty similar here too, we start by including the /socket.io/socket.io.js file, and then inside the script, we get the socket by calling the inbuilt io() function
- We then create two variables tea, coffee to store the current values of people who choose Tea & people who chose coffee
- Then we create a socket listener using socket.on() this listens for socket.emit() events that come from the Server and respond to them accordingly
- This is where the action word comes into use. Recall that while emitting data using a socket, the first parameter was the action word. This is exactly what we’ll be using as the first parameter in socket.on() as well
- The first parameter indicates that the Callback Function should only be called if the action word socket.emit() matches with the action word of the socket.on()
- Inside the Callback function, we simply increment the variables coffee and tea depending on the data received and update the HTML accordingly
Socket.io on Server Side
The Server Side implementation of Socket.io should be pretty simple. We first create a Socket.io server using the following command
const http = require("http");

const server = http.createServer(app);

const { Server } = require("socket.io");

const io = new Server(server);
The only job of this server is forward the emit() request of index.html onto the dashboard page
We do so by adding the following code,
io.on("connection", (socket) => {
  socket.on('chosen', function(data) {
    socket.broadcast.emit('chosen', data);
  });
});- In the above code, we first wait for a client to connect to the server using the .on(‘connection’) callback
- Then, we wait for one of the clients to emit a “chosen” action by using a socket.on()
- We then forward this action to all of the other clients using sockets. broadcast.emit() without changing the data
The website should now be completely functional and the sockets should be working as intended. Just as a recap, the data flow in sockets works in the following way
- One of the clients Emits an action to the server ( it’s important to understand that clients cannot directly contact other clients using sockets, it’s mandatory for it to through the server )
- The server then receives the action and if it decides, it can broadcast the data to all the other clients currently connected.
Conclusion
Congrats on coming this far and completing this tutorial on Sockets. If you would like to learn more about them, you can visit their official website https://socket.io/. A good step ahead would be to learn more about WebSockets ( the vanilla implementation of Sockets ) and to make another project with even more detailed real-time analytics. If you enjoyed this article and learned something new today, do share it with your friends.
