Apache Flex & Adobe Flash Player – Alternatives
Adobe and almost all browsers ( Google Chrome, Firefox, Safari.. ) have announced the END OF LIFE of Adobe Flash Player at the end of 2020.
To some of us, especially those who browsed the internet and appreciated it in its early days, this really might be a sad moment. Adobe Flash & RIA (Rich Internet Applications) enhanced the web experience by making it more fun with animations, video, audio, and games, essentially making it a lot more interactive and enjoyable
Today we’ll be discussing – in detail – Apache Flex – which is one of the main pieces of technology that made Adobe Flash a reality
Table of Contents
What Exactly Is Apache Flex?
Before moving ahead and trying to know anything else, it’s important that we first understand what exactly is apache flex.
Apache Flex ( Formerly known as Adobe Flex ) is a set of tools and libraries that helped in making Adobe Flash Apps and games. The Flex framework had 2 main components, MXML and ActionScript
XML

MXML is an XML-based markup language used for describing the UI of an application. If you know anything about the Web Development world of today, MXML can be understood as a sort of like a combination of HTML + CSS
To give you an understanding of how similar MXML and current-day HTML+CSS are, here’s a code snippet describing a Welcome Message
<?xml version="1.0" encoding="utf-8"?>
<mx:Application xmlns:mx="http://www.adobe.com/2006/mxml"
                layout="absolute" backgroundGradientColors="[#000011, #333333]">
   <mx:Label text="Welcome to my Flash Application!" verticalCenter="0" horizontalCenter="0" fontSize="48" letterSpacing="1">
     </mx:Label>
</mx:Application>
As you can see how we define the Website Content ( “Welcome to my Flash Application!”) and the Website Styles ( font size, background colors, etc ) are both in the same file!
To those who’ve worked with CSS before the way of styling things in MXML might not be too different after all, as we can see a lot of current-day CSS properties such as font size, layout=absolute in the MXML code above
ActionScript
This is the part of the Flex Application that’s supposed to handle Logic and Interaction. It has a lot of resemblance to current-day JavaScript and TypeScript as they too handle the Logic and Interaction of HTML pages in modern websites
Let’s have a look at some ActionScript Code and see how it compares with modern JavaScript
var name: String = "Derek";
var male: Boolean = true;
var age: Number = 23;
var hobbies: Array = ["football", "basketball"];
If you’ve worked with JavaScript before you can easily identify the similarities between JavaScript and ActionScript in things such as Arrays, Numbers, Strings, etc.
Creating Flex Apps in IDEs & Flash Builders
During the release of Version 3 of the Apache Flex platform, the popularity of it was so high that developers wanted to make it accessible & easier for more and more developers to be able to build Flex Applications.
To do this they added support for popular IDEs such as IntelliJ IDEA, Eclipse, and a lot more
Not just this, Adobe went as far as to create their IDE or Adobe Flash Builder purely for this purpose!
Adobe Flash Builder
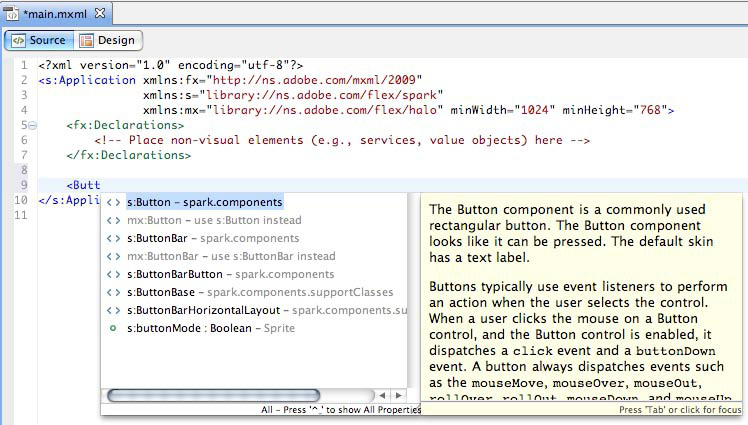
The release of these kinds of tools such as the Adobe Flash Builder made the developer community only more excited to keep building Flex Applications
Let’s quickly discuss the features of the Adobe Flash Builder ( formerly Adobe Flex Builder )
- MXML & Action Script – Syntax Highlighting
Since these were the main tools used in building Flex Applications, the Flex Builder offered Syntax Highlighting for these languages
- Design Mode
This feature was relatively new in IDEs of that era, Design Mode was a Powerful tool that showed us the Preview of our Flex Application without having to build it. And also allowed to Drag & Drop new UI elements directly without writing much code!
- Refactoring Features
This too was something new and provided developers with the ability to quickly Refactor ( Rename variables, create a function out of selected lines of code, split the code into multiple files ) the code without having to do the editing themselves
- Click based Integration
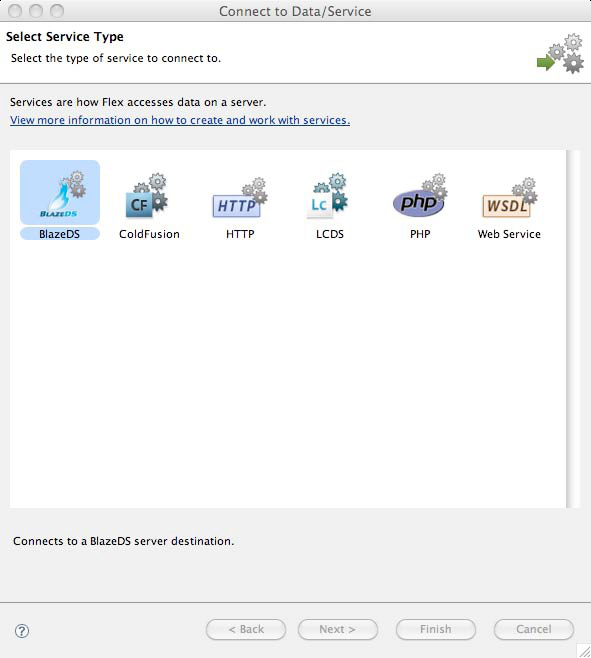
Flex Applications usually need something called Data Services to be able to properly and efficiently send/receive communications to and from the server, and integrating those into your Flex Application usually is a tedious task.
But Adobe Flash Player simplified the process by allowing you to simply choose the required Data Service and boom! You’re done integrating it into your app within a click!
Why did Adobe Flash & Apache Flex Decline?

After looking at all of the good things about these frameworks, tools, and languages it would be hard to believe that they would phase out one day.
But as with all the good things, even Adobe Flash & Flex had to be replaced by something else, something better.
Let’s now have a look at the reasons for its downfall
1) iOS Decided to Stop Flash Support On Newer Devices

Apple has always been among the companies to make the first move regarding technology, and more often than not that move greatly impacted the tech world. These things include – the removal of Headphone Jack on the latest iPhones, Selling The Charger Separately, and a lot more.
And This was the same with Flash. Steve Jobs wasn’t particularly a huge fan of having Adobe Flash on Mobile Devices as he believed it would make the browsing experience slow & sloppy and hence, stopped supporting it. This led to people re-considering possible alternatives to Flash.
Eventually, Apple also stopped supporting Flash from their default browser ( Safari ) on MacOS in 2015 – 5 years before its End Of Life ( EOL )
2) Flash Websites are NOT “Search Engine Friendly”

Search engines such as Google and Bing were only efficiently able to “crawl” through normal plain-text pages and displayed only those results at the top. Flash Files were relatively hard and time-consuming for these search engines to “Crawl” and detect, hence, this hurt the ranking of flash websites in search engines.
This realization further moved people away from Flash
3) Adobe Flash is not Open Source

The W3C or the World Wide Web Consortium is considered to be responsible for setting the standards for the web. However, Adobe Flash was not open source and the alternative technologies at that time ( HTML, CSS, and JavaScript ) were. Keeping in mind the interest of W3C, it wanted the standard technologies to adhere to the rules set by the organization. And they simply did not see how Adobe Flash would fit into this model
4) Flash Websites are Hard to Update
Compared to plain HTML websites where you just have to edit a few lines of text to update the site, updating Flash Websites is relatively hard as it requires you to entirely replace the flash files over and over again for every single change.
This was not considered to be sustainable by many developers and hence they moved on from Adobe Flash
5) HTML5 is faster and better

One of the primary reasons for the decline of Adobe Flash was that it was easily replaceable with HTML5 as it was open source, supported the majority of Flash’s features, was much more lightweight and fast, and didn’t require any additional “Plugin” installation like flash player did. It was also built-in for the majority of browsers and eventually became the standard
6) Flash had Security Issues

Compared to a normal webpage a Flash App had much more control over the components of your computer as it had much more Rich Functionality and was almost run as a Standard Computer Application, this provided scope for hackers to exploit vulnerabilities in the system and execute malicious code on the computer! Eventually, the vulnerabilities got so bad that major browsers had to disable flash by default and now even Adobe recommends uninstalling Flash Player and using the more modern development standards such as HTML/CSS/JS
Apache Flex Alternatives
For building flash applications, there were quite a few Open Sourced alternatives to the Flex Framework, some of them are
- Google FLIT A lightweight version of the Flex Framework made by Google, this was the most known alternative for flex at the time
- OpenLaszlo is An independent project, built on top of Apache Flex adding additional features to it, however, support for this ended long ago and it was not particularly popular even in the Flash Era
However, now that Flash apps are obsolete, To build interactive applications just like Flash, the modern web alternatives are HTML5 and Javascript.
Interestingly, the introduction of these alternatives (HTML5 & JavaScript) made people realize the flaws of Flash and therefore led to its downfall
Current Status of Apache Flex

With the decline of Adobe Flash Player, the majority of the technologies supporting it also declined in popularity as they got replaced with newer and better tools, including Apache Flex
Looking at the decline of Adobe Flash, Apache decided to release a new framework called FlexJS that would allow you to compile your Flex applications into plain HTML/CSS and JavaScript
This project was later renamed Apache Royale and now it is a platform for developers to write code in ActionScript & MXML, the same technologies that Apache Flex used, and export these apps to a wide variety of platforms including JavaScript Websites, Android apps, and a lot more
ApacheRoyale is usually very active on their Twitter handle @ApacheRoyale and you can learn more about them, and even try to connect to them over there!
Should you use Apache Flex? – Personal Opinion
Even though there are projects such as Apache Royale that allow us to write code in ActionScript3 and MXML the real question would be “is it even worth doing all of this?” Especially when the entire world has moved on to better technologies.
In my personal opinion, these types of projects should only ever be used if you want to just have fun or Migrate an old Flex Application and give a new life to it. But Starting an entirely new commercial project in Apache Flex in this age and time, might not be that good of an idea.
